The guide to installing akupanel
Whether it is a theater, sports venue, performance hall, restaurant, factory, gymnasium, office, conference room, bedroom, or home entertainment space, it all requires acoustic treatment. Otherwise, excessive reverberation and echo can seriously damage the acoustic quality of the space and our hearing. To mitigate echo and reverberation, you can decorate your room walls and ceilings with acoustic panels that absorb the energy of reflected sound.
Our Akupanels are cost-effective and made from 3 simple materials (wood veneer, MDF wood strips, and PET acoustic panel), which are environmentally sustainable and durable. Akupanel In addition to sound absorption, it also provides heat insulation. They are also available for wall and ceiling applications.
Akupanel will improve the sound quality of your room. It helps reduce background noise, improves sound absorption, and is often used in acoustic treatments. But if you’re wondering how to install Akupanels on your wall? That’s it.
Construction Conditions
Before installing Akupanels, the roofing, masonry construction, ceiling, and wall construction projects should be completed, and the base layer should be ensured to be smooth and clean.
The locations of lamp positions, vents, various lighting openings, and sockets have been determined.
The installation site should be kept dry, and the ground should be cleaned and free of water, dust, and debris.
Akupanels Protection Measures
Akupanels need to be left in the place where they are to be installed for 48 hours so that the acoustic panels can adapt to the temperature and humidity of the room.
When transporting Akupanels, be careful to handle them with care to prevent material collision damage. Excessive handling is strictly prohibited.
Akupanels should be placed in a dry environment within the building as much as possible and stacked on flat wooden strips isolated from the ground to prevent the material from getting damp.
Installers wear clean white gloves to avoid damaging and contaminating the surface of Akupanels.
Akupanels Wall Installation
glue or screws, so the most important thing is to make sure the underlying material is in good condition. Before starting any work, check for any damaged plaster, loose tiles, or similar. If so, you will need to repair the surface to ensure it can accommodate the panels.
Make sure the wall is dry, smooth, and free of obvious cracks and uneven areas. If there are problems with the wall, they need to be repaired in advance.
According to the number and size of the sound-absorbing panels that need to be installed, measure the position and spacing on the wall to determine the installation location of the sound-absorbing panels.
Use a level and pencil to mark the location of the acoustic panels to ensure installation accuracy.
Tools and materials required for installation. It usually requires the use of electric drills, screwdrivers, screws, wall glue, and other tools.
The installation process of Akupanels is actually very simple, so you don’t have to spend a lot of extra time, money, and effort to get the look you want.
Just decide whether to install with glue or screws and get to work.
1. Direct Fixing With Glue
- Start by preparing the wall. Clean the wall and remove any screws, nails, and other obstacles on the wall.
- The panels are then glued directly to the wall using glue. Using a caulk gun, apply glue to the back of the board in a zigzag pattern. Carefully press the panel into place on the wall. To further secure it in place, you can tap the panel with a rubber mallet.
2. Direct Fixing by Screws
- Start by preparing the wall. Clean the wall and remove any screws, nails, and other obstacles on the wall.
- Mount the panel on the wall by drilling the screws (35 mm.) through the polyester and into the wall. We recommend 16 screws per panel.
With the above installation method, the sound absorption effect is only Class D. To improve the sound absorption effect, please follow the installation methods below:
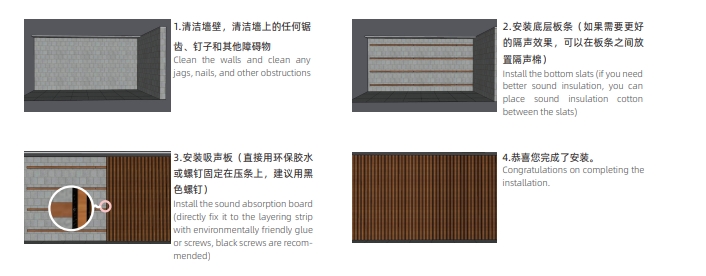
3. Batten Fixing
- Start by preparing the wall. Clean the wall and remove any screws, nails, and other obstacles on the wall.
- Mounting the underlying battens. mount battens on the wall. keep a distance of 600mm between the battens.
- The cavity should include fiberglass sound-absorbing cotton or foam which will increase the acoustic performance.
- Mount the Akupanels on the wall by drilling the black screws (35 mm.) through the black PET acoustic panel and into the battens. We recommend 16 screws per Akupanel.
Akupanels Cleaning and Maintenance
All wood acoustic panels are subject to soiling and wear. A regular maintenance program, initiated at the earliest time after installation, will prevent staining from soil and dirt buildup.
Regular vacuuming will maintain the Akupanels’ performance by keeping the perforations open.
Clean all of our acoustic wood panels with water-based cleaning agents. Blot the soiled areas with a damp cloth containing the water and soap solution. Do not overwet.
Inconspicuous area of the Akupanel before applying the solution to the rest of the surface.
Wood acoustic panels are typically not recommended for areas where excessive soiling may occur, however, if any contact with grease and oil occurs, the panel should be cleaned immediately.
Cleaning agents used on the Akupanels should not contain alcohol, strong alkalis, or solvents, which can damage the Akupanels.